Your Ad Here

0 Useful Post For BSNL Braodband 500 Plan Customers

ARE YOU A BSNL CUSTOMER OF 500 PLAN? – IF SO CHECK THIS OUT TO AUTO DL/UP FILES IN UR ABSENCE…..


What it is?

You Have Already Seen My previous Post On How to check BSNL BroadBand Usage and Updated List Of BSNL BroandBand Check Balance and DATAONE A firefox addon For BSNL BROADBAND Balance Check But This is for 500 plan users
• Are you a BSNL Customer or ur service provider offers u only limited usage…………… if so u can download or  Upload Files automatically with u r absence.
• BSNL offers free usage between 02:00 AM – 08:00 AM. To set this Process set u r computer as given below……..
How it works in Windows XP?
• It will set the platform in such a way that it will automatically starts u r system @ specified time and start DL/UL the files.
And after finishing of task it will Shutdown @ specified time.
How to set this process in u r windows XP?
Step 1:
• The Basic thing to do first is to leave CPU Plugged into switch board & UR router/Modem (if any) to put it ON to start it automatically (i.e. U can plug UR CPU & Modem Plugged into UPS).
• U need to have this software called Auto Power  on & Shut-down to Start u r system @ given time


Or u can directly wake up u r system @ given time via BIOS settings ( u can set u r bios to start u r system @ given time.. it will be available in Bios > Power settings )
• Set the Auto Power-on & Shut-down to start the System use power on option as given below
• This will start u System @ particular specified time.
• This will tender u r computer to start @ 02:00 Am with u r Absence.
• Set the tick as given in the Below Figure.


Step 2:
• To connect to internet @ start up u need to have a .bat file.
• Open notepad & type “rasdial connectionname username password”( no need to give in double quotes).  Save as connet.bat by selecting save type as All files.
• Now place the shortcut of connet.bat in “X:\Documents and Settings\All Users\Start Menu\Programs\Startup”. With this all the shortcuts u place Here will be starting its applications @ start up.
• Not only this…. any shortcut (i.e. any application’s) u place it here will be starting @ startup.
Step 3:
• Now u need to set u r application like uTorrent or Vuze for Downloading or Uploading (i.e. seeding) of files.

U can get it from Torrent - a (very) tiny BitTorrent client or Vuze: The most powerful bittorrent app in the world.

• U can add u r TORRENT FILES in these Clients to start its process.
• To start uTorrent @ startup, set it like given below.
• Set the other setting of uTorrent as given in the figures.


• If u r using Private Tracker U need to disable (UN Tick) the DHT Network services as given below.


To set the Scheduler process in uTorrent , set it as given in the below figure.


Step 4:
• After Downloading the System need to be Shut Downed Automatically, so u need to set this process as given in below figure.


Then it will ask to go into sleep instead of shutdown, select CANCEL


This will make UR System to Start and Stop Downloading or Uploading of Files @ a specified Time Interval.

For users preferring direct downloads from file hosting sites like RS/MU/ST/HF/NL and so on...........


1. Follow the instructions given above for System Start Up, Shutdown and Connect To Internet.

2. Download and install IDM (Internet Download Manager). Now if u r a premium user from any file hosting site, u can utilise the queue downloads supported by IDM for downloading at those free hours . What u have to do is that just select all the links (suppose u want to download a 700 movie with 7 parts, then select all the 7 download links) at once with ur mouse, then right click on the mouse and select "Download with IDM" option, then click "OK". All the links will be added to the queue.

To adjust the no. of files u want to download at the same time, start IDM and then follow this:

IDM > Scheduler > "Files in the queue" tab

Now from the Scheduler, You can schedule the start and the stop times of download according to ur requirement.

You can also press "Start Queue" and "Stop Queue" on the main IDM toolbar to start and stop main download queue, if u want do download at anytime.

N.B. - As far as I know IDM supports all file hosting site if u are a premium user of the concerned site.

Liked My work please leave comment

0 Datafox:-utility for BSNL broadband check balance with Firefox

DataFox

credits:-thegoan


DataFox is a bandwidth usage monitor for BSNL’s DataOne and MTNL’s TriBand broadband services. DataFox is a cross platform extension written for Firefox; if you use Internet Explorer or any other browser, DataFox will not work for you. Tough shit. Version 1.7.5 is compatible with Firefox versions 1.5 – 3.5 and supports all BSNL sites (including bbservice.bsnl.in and data.bsnl.in) and both MTNL Bombay/Delhi sites (including 59.185.101.2).
DataFox in action on the Firefox status bar…
menu tooltip
DataFox context menu DataFox tooltip

Download, Installation & Updates

If you’re using Firefox, click here to install the extension directly. Alternatively, right click, choose Save Link As… and save the XPI file locally. Open this file in Firefox (File > Open File…) to complete the installation. DataFox has been tested with Firefox versions 1.5, 2, 3 & 3.5. To activate this extension, you need to restart Firefox. Firefox might show you a message at the top of this window, saying it prevented thegoan.com from asking you to install an extension. Click the Options button in the message and then click Allow in the dialog that shows up. Click the link again to install.
To update, go to Tools > Add-ons and select DataFox in the list. Right click to bring up the context menu. Select Find Update. Firefox will connect to my update site and inform you if an update is available. If one is, click Install Updates and you’re done.

Use

DataFox is really easy to use. Once installed, you should see this icon (
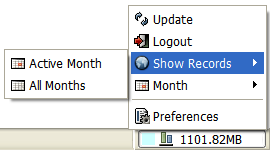
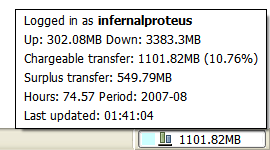
) in your status bar. Click it to bring up the login dialog. Select your ISP, then enter your name and password and click the Login button; that’s it. Click the icon again to refresh the usage data. Since version 1.4, if you keep CTRL pressed when you click this icon, DataFox will display details from the most recent successful update. This can come in handy if the usage server is down and you’d like the previous details restored.
DataFox works by obtaining usage information directly from the BSNL / MTNL usage site, it does not monitor your network in any way, so usage details probably won’t change until you logout of DataOne / TriBand and log back in again. BSNL users may want to use the Override default domain option in the login dialog in case the BSNL server you are being directed to is not responding (see below for explanation). Users who normally use bbservice.bsnl.in/data.bsnl.in to check their usage must check this option and select the corresponding domain from the domain list. MTNL users, if the usage server is down, DataFox will not be able to fetch any usage records.
You can right click the status bar icon to bring up the following options:
Update Forces the usage data to update, has the same effect as clicking the icon.
Logout Allows you to re-enter your account details the next time you update.
Show Records Display your usage records in the browser, you may choose to see records of either the active month, or the selector for all months.
Month (BSNL Only) Choose the month for which usage data is fetched. DataFox will allow you to choose one of six months as this is the extent of the records available online. In case data for a month does not exists (say, if you have only been using DataOne for three months) then DataFox will display an error message when trying to fetch the usage info.
Preferences Brings up the DataFox preference dialog (see below). Can also be invoked from the Tools menu.
Login Dialog options: Override default domain (BSNL Only) By default, DataFox first queries sancharnet.in for the appropriate address at which your usage can be checked. I assume it sends you to a server in your region for the quickest response. In case you wish to specify your own address or in case the redirect is not working for some reason, check the box and choose an address from the list or enter your own. bbservice.bsnl.in users (those with IP addresses in the range 117.*.*.*) must check this option and select bbservice.bsnl.in from the domain list, DataFox will not work for you otherwise. In the username field and password fields, you must enter your 14 digit portal Id and corresponding password; these are different from the username and password you use in your dialer / modem / router.

Preferences

Login on startup:
If this is checked and you have a password saved, DataFox will attempt to log in to your ISP’s site and show you the most recent usage details. If unchecked, DataFox will display cached details on startup.
Bandwidth limit:
If you’re using DataFox, you’re most likely on a bandwidth limited plan. Entering your limit here will enable DataFox to display a progress bar indicating the percentage of bandwidth (for the current month) consumed. DataFox will also be able to tell you if you are danger of reaching your limit before the month ends and how much “surplus” bandwidth you have for the current day. If you do not enter your limit, none of these statistics will be available.
Statusbar / Tooltip string:
DataFox parses the data returned from your ISP, makes some calculations and places the results in several variables…
[BSNL]{tS}-Total Upload
[Both]{tR}-Total Download
[BSNL]{tX}-Total Transfer
[Both]{cX}-Chargeable Transfer
[Both]{sX}-Surplus Transfer (for today)
[Both]{rX}-Remaining Transfer (for the month)
[Both]{uP}-Used Percent
[Both]{aP}-Allowed Percent
[BSNL]{tH}-Total Hours
[Both]{YM}-Year-Month
[Both]{tT}-Last Updated
You can place any text in the Statusbar string or the Tooltip string, and DataFox will replace any variables in the text with their actual values.
An example: I’ve transferred 2 GB in all but only 1.5 GB if the night transfer is excluded. So the string “{tX}GB / {cX}GB” will produce “2.0GB / 1.5GB”.
Progress page:
This page controls the colors used by DataFox under different usage conditions. If you do not specify your Bandwidth limit preference page, only the Usage OK colors will be used. On the other hand, if you do specify the limit but still do not want the progress bar to appear, you can simple uncheck the enable box.

How DataFox tracks your bandwidth use

Note: The following only applies if you have specified your bandwidth limit.
Let us assume you have 6000MiB of transfer for the month, and you’re in the month of June (which has 30 days).
DataFox will calculate that you have 6000/30 = 200MiB of transfer available per day (let’s call this TPD); assuming that you’re using your bandwidth at a regular rate. This means, on the 1st of the month, you’re allowed 1*TPD = 200MiB and on the 5th of the month, your usage could go upto 5*TPD = 1000MiB and you’d still be within limits.
Allowed Transfer = date * TPD
Surplus Transfer = Allowed Transfer – Chargeable Transfer (Chargeable Transfer is the actual bandwidth that is recorded by your ISP and deducted from your bandwidth cap – this is the figure you usually keep track of).
Now, if your Surplus Transfer is negative, DataFox puts your usage in the Overlimit category and the Overlimit colors will be used for the text and the progress bar. If your Surplus Transfer is positive, your usage is OK and a different set of colors is used. It is important to note that the Surplus transfer is not the difference between your monthly limit and the amount used till date. It is the difference between the allowed usage on that date as calculated by DataFox and your actual usage.
Illustration Bandwidth limit: 6000MiB, Nr. of Days in month: 30, therefore TPD = 200MiB.
On the 5th:
Chargeable Transfer as recorded by your ISP 850MiB
Allowed Transfer as calculated by DataFox 5 * TPD = 1000MiB
Surplus Transfer = Allowed – Chargeable 1000 – 850 = 150MiB (OK)
On the 15th:
Chargeable Transfer as recorded by your ISP 3300MiB
Allowed Transfer as calculated by DataFox 15 * TPD = 3000MiB
Surplus Transfer = Allowed – Chargeable 3000 – 3300 = -300MiB (Overlimit)
On the 29th:
Chargeable Transfer as recorded by your ISP 6500MiB
Allowed Transfer as calculated by DataFox 29 * TPD = 5800MiB
Surplus Transfer = Allowed – Chargeable 5800 – 6500 = -700MiB (Overlimit)
DataFox is also capable of calculating the allowed usage on an hourly basis instead of on a daily basis (see the Daily / Hourly radio buttons on Progress preference page).
Here DataFox calculates a TPH figure as 6000 MiB / (30 * 24) hours = 8.3MiB per hour. At 2pm on the 5th of the month, 4 * 24 + 14 = 110 hours have passed. Your allowed usage at this time is: 110 * 8.33 = 916.3MiB.
The remaining calculations are the same. I programmed this in before the daily mode and then I realized this was probably too accurate to be useful, so I made the daily mode the default.

Changelog

Version 0.8
  • Initial verision suppports BSNL DataOne only.
  • Basic tooltip and statusbar preferences.
Version 0.85b
  • Support for MTNL TriBand.
  • Multi-window awareness.
  • Ability to execute Javascript in tooltip and status bar strings.
  • Login on startup optional.
Version 1.0
  • Progress bar.
  • Bandwidth limit awareness, tracking and reporting.
  • Preference changes take effect immediately.
  • New preference for data unit and decimal point accuracy.
Version 1.0.1
  • Bugfix: BSNL bandwidth limit awareness.
  • Bugfix: MTNL Bombay Session Records.
Version 1.2
  • Bugfix: Rounding error could cause progress meter to display wrong color.
  • Firefox 3 beta 4 support added, many FF3 related fixes.
Version 1.4
  • Support added for new BSNL portal (bbservice.bsnl.in).
  • DataFox will now cache results automatically.
Version 1.5
  • Works with bbservice.bsnl.in update (~ July 2008), consumes much less bandwidth.
  • Code cleanup: Global variables significantly reduced, better Firefox citizen.
Version 1.7
  • Works with data.bsnl.in.
  • Works with MTNL Bombay site for ‘@’ users (59.185.101.2).
  • New variable {rX} added for remaining transfer.
Version 1.7.5 (Current)
  • Works with data.bsnl.in update (~ May 2009).
  • Miscellaneous minor fixes.
  • Bumped max Firefox version to 3.5.*.

0 Updated list of BSNL broadband Balance Check


hello friends u have already seen my previous post on how to check BSNL broadband balance here is the updated list
i have also recently taken a BSNL 250 plan bcoz i am also net user,so start the story
Unless you use an unlimited plan, your bill will be based on your usage data as recorded by BSNL. If we use more than the allowed limit, we need to pay extra for this usage. Even if we are careful, some virus infection in our system can  increase the chargeable units to a dangerous extent.  It can happen even if you have a very good antivirus. Therefore it is  important to monitor the usage closely. Unfortunately BSNL fails to provide useful information to its users. Many of us rely on a single BSNL site we managed to identify for monitoring the usage.
BSNL sites do not update on a real time basis and is neither dependable as it has a very high downtime due to maintenance and billing activities. From 1st to 5 th of every month, BSNL sites are totally unreliable as they are used for billing purposes than updating user details. If you are a new user, your usage details may not appear for about 2 weeks. From my personal experience, I can tell you that BSNL may update the usage on 1st of month on 20 th. I ended up with a huge bill after they did this to me.
Another common error is that many believe usage means only download. BSNL calculates your usage as  download + upload. If we use internet just for browsing, it will cost around 15 MB per hour in your usage stats. It is impossible to manually calculate the usage. Please use the following methods.
BSNL allots two server IPs. One of the format 117.xxx.xxx.xxx and other 59.xxx.xxx.xxx. If your IP starts with 59.xxx, options other than option 3 may not work for you.
In that case, Check here.  To check your IP, Click here.
You can also test your speed on the link given above. If you find it difficult, use  What is my IP ?
How to Check BSNL Broadband Usage details – Methods
There are 3 sources to check your usage. 1 BSNL portal, 1 Independent software and 1 BSNL software.
1BSNL Portal , values in MB, user friendly.
    Connection with IPs 59.xxx.xxx.xxx
2.  Both these sites can be down at times. BSNL sites do not update on real time basis. Today's usage is shown  after 2 days. So most of us use a Bandwidth meter.
Click here to download. (Top Rated)
3.  A software from BSNL can help us check the usage without using the portal. Click here to download.
BSNL also provides SMS and email alerts when you cross your usage limit. You can also receive weekly alerts.
Use this link to register    Web Registration for Usage Alerts
Option 1  needs a 14 digit Portal ID and password from BSNL. Password is usually password.
Eg. for portal ID:
ABC+++25102008, where
ABC from my surname, +++ a 3 digit no. , 25102008 date of broadband application. If you do not have this, check with your local exchange. They normally keep this in their records. A phone call can fix it for you.
Your BSNL email ID will receive email alerts when the usage limit is crossed. Always ask your exchange for email ID. If you try to use option 3, it will ask for your BSNL email ID.
Use option 1 , log in using Portal ID and password and check for the email link on the upper part of the page.

Other methods and tools:
The above mentioned are sources for information. Many were kind enough to write programs that we can save the trouble of logging into the portals. Let us discuss a few reliable options.
1. Datafox
If you use Firefox, an add on called Datafox can retrieve data from BSNL site. Click here to download   


2. Dataone Quick Usage Finder
Dataone Quick Usage finder logs in automatically to the BSNL portal and retrieves data for you. It has a facility to calculate the billed amount (excluding telephone charges). If we exceed our usage, we can find out how much extra should be paid in the next bill. It also provides a Dialup Connection and disconnection scheduler for Night Unlimited Plans. Click here to download.
3. Dataone Tool
  • Daily total of non free and free usage ( for those having night (2am to 8am) unlimited).
  • Graphic display of daily usage.
  • Option to auto login to dataone usage checking site.
  • Summary of usage, daily average used , average usable, estimated bill etc.
For users with IP 59.xxx.xxx.xxx
Click here to download. More details.
For users with IP 117.xxx.xxx.xxx
Click here to download. More details.
Don't know your IP ? Check here - What is My IP ?
Hope you will find them useful. Please do spread the word and help your friends from falling prey to huge bills.
Please note that the above tools simply retrieve data from BSNL portals. If data in BSNL website is not up to date,  you will get non finalized data
credit:-naradhavicharam thegoan
thanks


Visitor No.

Free Counter

Rank

About Me

To leave a comment use any Browser But not IE 6! You Can Use IE 7 or 8
Do not use IE 7.0 I am An Indian Who Loves Web AndTechnology

Privacy Policy

We do not host or upload any of these movies or any other content that are available on this Weblog. We merely search on internet and index popular games openly available to anyone.Please contact us through email, if you feel that any content including videos on this blog are objectionable or violating your copyrights. The objectionable content shall be promptly removed from our blog.Because we don't maintain the files, we cannot fix broken links. If you find a broken link let us know and, if possible, we'll tray to find a new link. We Donot Claim Any Originality For The Items Displayed On This Website.

The Best Tips Tricks and Tutorials by Jayaraj Yadav Copyright © 2009-10 Proudly Powered By Blogger